The Debtors application is where debtor accounts are created and managed and sundry debtor transactions - non bookings invoices, cash receipting, credit notes etc - can be entered. A Debtor is a person or company that owes money to the Tourplan User Company. Debtors can be Agents,Wholesalers etc, but may well be individuals.
Any company or person, to whom an invoice is sent, MUST be set up as a Debtor. This includes non-trade debtors, as well as a Cash Sales Debtor if cash is collected directly from clients.
Bookings invoices must be raised from within the bookings modules. Credit Notes can be raised from within the bookings applications, but this can be restricted if required. Unless Automatic Receipting has been turned on, receipts can only be issued from Debtors.
To access the Debtors Application, on the main Tourplan Menu click on Financial's in the side bar and then on the Debtors icon ![]() .
.
Screen Shot 2: Debtors Opening Screen
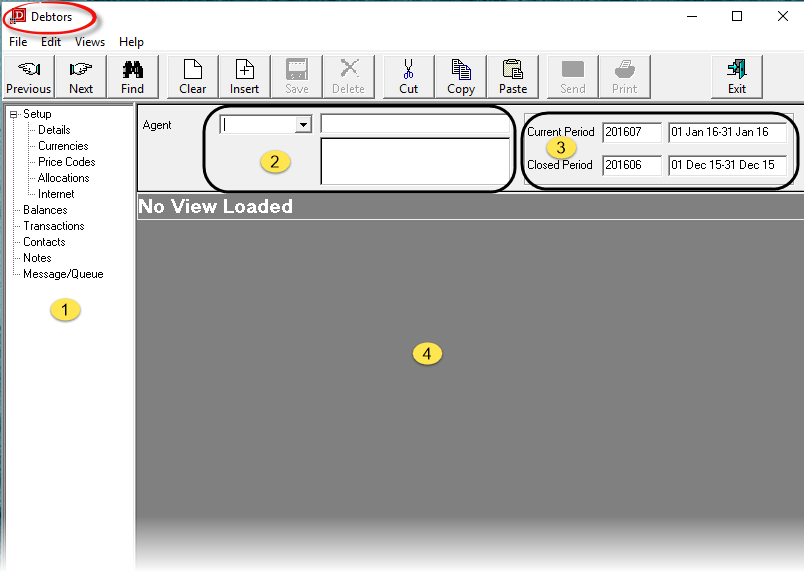
When the Debtors application is opened, the screen shown in Screen Shot 2 Debtors Opening Screen. The sections in this screen are:
 Menu Tree. The Menu Tree allows access to all parts of the debtors application
 Debtor Details. These three fields display the debtor code, name and address details
 The Debtors Ledger current accounting period number and dates and the last closed accounting period number and dates.
 The work area which will become available once an existing debtor is selected or a new debtor is being created.
Screen Shot 3: Insert New Debtor - Step 1

|
In this document, the words "Agent"and "Debtor" have the same meaning. |
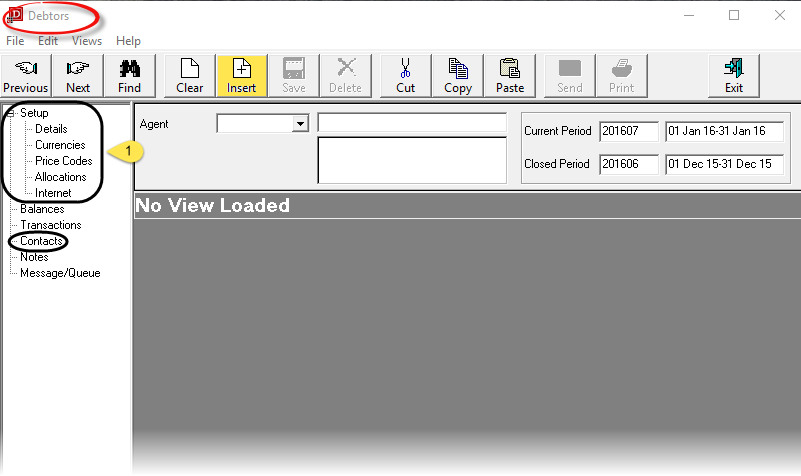
To add an agent, click on the Insert button  in the button bar. This will start a New Agent Wizard which will step through the agent set-up on a screen by screen basis. The screens which are accessed sequentially in the set-up wizard are those circled (
 ), plus the Contacts screen.

|
The new Debtor record is not saved until the Wizard has been completed. If the  or or  buttons are clicked at any time before the Wizard completes, all data is lost. If a simple error is made during the setup, either click the buttons are clicked at any time before the Wizard completes, all data is lost. If a simple error is made during the setup, either click the  button in the Wizard Bar to go back to the screen and correct the error, or make a note of the screen the error is in and return to it after the set-up is completed. button in the Wizard Bar to go back to the screen and correct the error, or make a note of the screen the error is in and return to it after the set-up is completed. |
A small dialogue screen will overlay the main Debtors screen.
Screen Shot 4: New Debtor Code/Name Dialogue
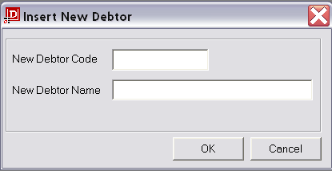
New Debtor Code (6 Chars)
The code is alphanumeric and is used throughout Tourplan to find and sort agents.

|
Always use all 6 characters for all agents to allow flexibility and consistency. If less than 6 characters are used, it can make searching for agents difficult, since the system will always find, alphabetically, the agent with the least number of characters in the code. |

|
Try to maintain consistency in the coding structure. This will make it easier for consultants to locate agents when searching within the Operations > bookings applications. |

|
This dialogue box is also used to copy one agent to another agent. See Copy Agent. |
New Debtor Name (60 Chars)
Enter the Agent Name.
|
|
Click the OK Button to continue setting up the new agent |
|
|
Click the Cancel Button to exit the New Debtor Wizard |
Screen Shot 5: Insert New Debtor – Details Tab
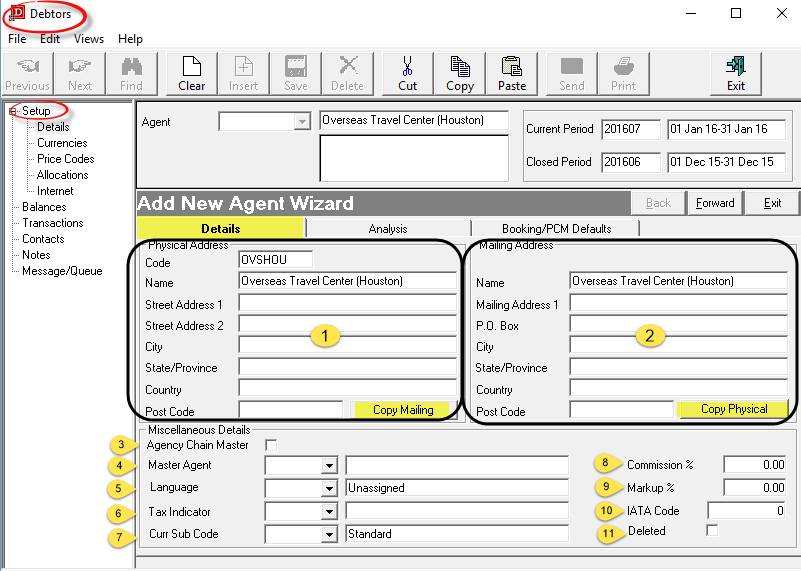
In the Details screen, there are three tabs - Details, Analysis and Booking/PCM Details.
The Details Tab opens after the debtor code and name have been entered.
Two sets of Name/Address fields are available; Physical Address ( ) and Mailing Address (
 ). These can be different. When a new agent is being created, what is entered into the physical address fields is replicated in the mailing address fields which can be overwritten if necessary. The 5 labels (Street Address 1 etc.) for both physical and mailing addresses can be user defined in the (AR) INI Maint application. In Screen Shot 5 Insert New Debtor – Details Tab above, what was Mailing Address 2 has been set up as P.O. Box.

|
It is imperative that consistency be maintained when entering address detail—i.e. always use the same line for the Street Address etc. |
The two Copy Buttons (Mailing & Physical) can be used to copy the address details from one section to the other if necessary.
 Agency Chain Master/
 Master Agent (Checkbox/Drop-down)
Tourplan allows agents to have subsidiary agents. This feature means that (e.g.) Debtors Statements or Agent Messages can be sent to the head office/master agent, detailing transactions or services for subsidiary agents. In order for this feature to work, the system has to know which agent is the master and which are the subsidiaries. If the agent being entered is a master, then click the check box Agency Chain Master  . If the agent entered is a subsidiary of an agent which has already been entered and defined as a master, click the drop-down Master Agent
 and select the master agent from the list. If the agent being defined is not a master or a subsidiary agent, leave both fields blank.

|
Transactions for subsidiary agents do not post to the master agent. The master agent code attached to the subsidiary enables debtor statements/request messages etc. for the subsidiary debtor to be sent to the master debtor. |
 Language (Drop-down)
The language code determines which set of document and message templates will be displayed when sending messages to this agent. These language codes must first have been set up in CodeMaint. If foreign language documents or messages are not to be produced then leave this field as 'Unassigned'.

|
More detail on documentation language is in the System Setup Training Guide > Messaging Setup > Language (Codes). |
 Tax Indicator (Drop-down)
The Tax Indicator is used to calculate how taxes on mark-ups and commissions are applied for bookings for this agent. The indicator is a numeric value from 0–8. Available settings are:
|
Tax |
Mark-up |
Commission |
|
0* |
Taxable |
Taxable |
|
1 |
Taxable |
Non-Taxable |
|
2 |
Non-Taxable |
Taxable |
|
3 |
Non-Taxable |
Non-Taxable |
|
4 |
Proportionate |
Non-Taxable |
|
5 |
Non-Taxable |
Proportionate |
|
6 |
Proportionate |
Proportionate |
|
7 |
Proportionate |
Taxable |
|
8 |
Taxable |
Proportionate |
* This is the default value unless changed in the Debtors INI settings.
Where a component of the Tax Indicator is Taxable, the Mark-up/Commission has tax applied based on the Tax Code named in the Tourplan System INI table field MARKUPTAX. Where a component of the Tax Indicator is Proportionate, the calculation of tax on the mark-up/commission is proportionate to the tax value on the services overall. A Proportionate setting enables the system to calculate tax on mark-ups/commissions correctly when not all services in the booking may attract tax.
The value which will be applied to each agent during set up as a default can be set with the Debtors INI setting DEFAULTAGENTTAXIND. The Tax Indicator can also be overridden at the booking level.
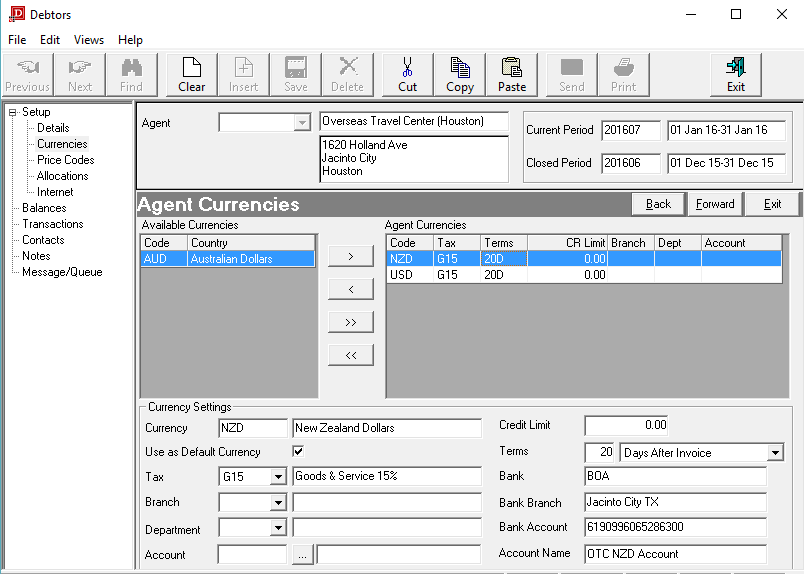
The Currency Sub Code is used by the system to determine which currency exchange rate between a pair of currencies is to be used when generating a booking invoice in the situation where the booking currency is different to the invoice currency. As will be seen in Screen Shot 9 Completed Currencies Screen – Example 1 USD and Screen Shot 10 Completed Currencies Screen – Example 2 NZD, the agent can have multiple currencies attached, and the system allows the booking to be in any currency that is attached to the agent, and allows the invoice to be raised in any currency that is attached to the agent.
If foreign currencies are not being used, this field can be left blank.
 Commission % (Numeric, 8.4)
If a fixed percentage commission is paid to the agent for bookings, enter the percentage value in this field. If commission is not paid to this agent, leave the field as 0.00. If the agent can receive multiple rates of commission then leave the field as 0.00 and set commissions on an individual booking by booking basis in the booking applications.
 Mark-up % (Numeric, 8.4)
The standard mark-up to be applied on all bookings for this agent. If there is not a standard mark-up for this agent leave as 0.00 and apply mark-up in the Tourplan Booking applications. If mark-ups have been applied on a product by product basis in the Tourplan Database, then leave this field as 0.00.
 IATA Code (Integer, 8)
This agent’s IATA/ARC code (optional).
 Deleted (Checkbox)
When checked the agent will be"hidden"when bookings are made, so that a consultant cannot attach the agent to a booking. The agent is only available for maintenance via the Debtors application.
Screen Shot 6: Insert New Debtor - Analysis Tab
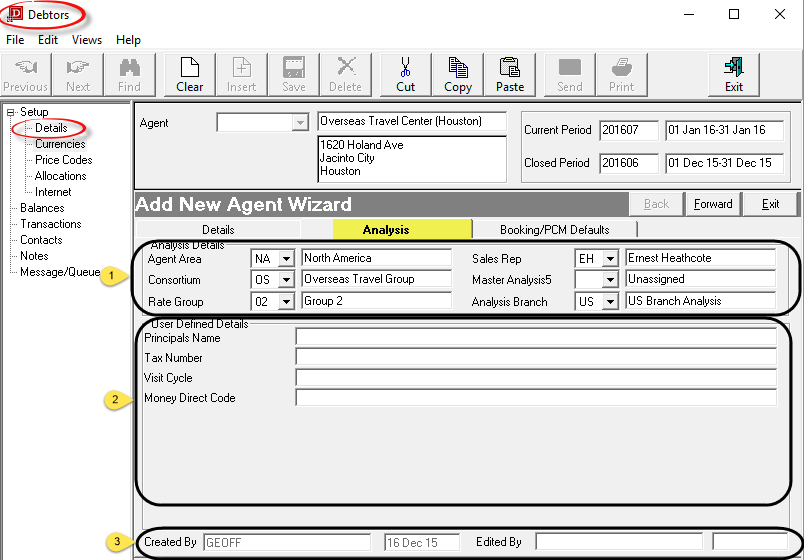
The Analysis Details Screen is accessed by clicking the Analysis tab and enables Analysis Codes to be attached to the agent, as well as user-defined text.
Analysis Details Section
 Analysis Details (Drop-downs)
There are 6 Agent Analysis fields available. The labels for these 6 fields can be user-defined in INI Maint > System. If the labels have not been defined, they display as Analysis 1 etc. Once the labels have been defined, codes can be entered into the Analysis data tables via CodeMaint > Accounts Receivable. If analysis codes are not going to be used, the blank value Unassigned should be used.
The Analysis fields can be used to select agents for inclusion in Debtors, Booking & Management reports.
The examples in Screen Shot 6 Insert New Debtor - Analysis Tab above have been used as follows:
|
Analysis 1 |
Agent Area |
Country the agent is domiciled in. |
|
Analysis 2 |
Consortium |
The agency consortium/group |
|
Analysis 3 |
Rate Group |
Tariff Rate Group applying to the agent |
|
Analysis 4 |
Sales Rep |
Sales Representative who visits this agent. |
|
Analysis 5 |
Not Used |
|
|
Analysis 6 |
Analysis Branch |
Special code used for Tax Analysis |
Note these are examples only. Some other examples could be:
User Defined Details Section
 User Defined Details (60 Chars)
There are 10 user-defined text fields of 60 characters each which do not display on this screen until the text fields have been labelled in INI Maint.
These fields can be used as selection data and output in the Excel based Tourplan Financial Analysis and Operational Reports.
 Created By/Edited By
These fields display the date of the agent creation, and the name of the user who created the agent and the date, and name of the user who last updated the agent. These fields are non editable.
Screen Shot 7: Insert New Debtor - Booking/PCM Defaults Tab
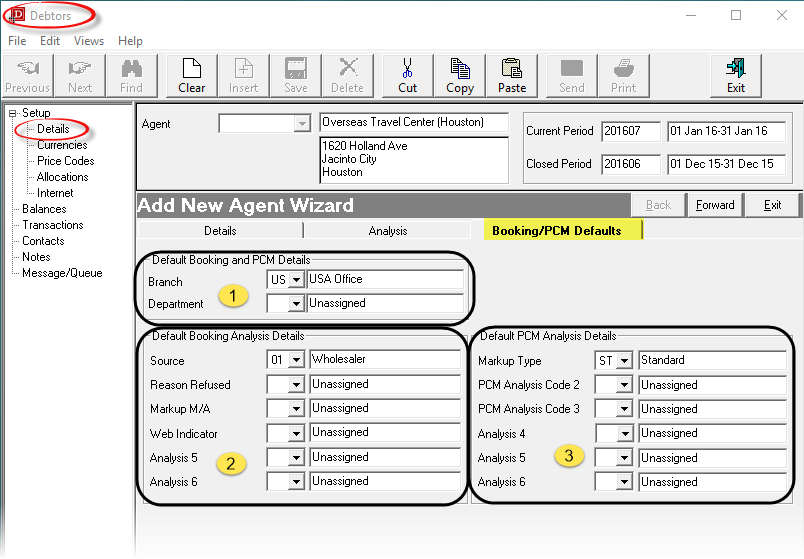
The dropdowns in this screen allow defaults to be set against the agent which will pre-populate Booking and PCM's when new Bookings or PCM's are created that has this agent attached. The defaults can be changed within the Booking or PCM
 Default Booking and PCM Details
Branch & Department (Dropdowns)
These two fields are the first two components of the Booking Reference.
 Default Booking Analysis Section
Default Booking Analysis Fields 1 - 6 (Dropdowns)
These are the 6 analysis fields that are attached to each booking.
 Default PCM Analysis Details
Default PCM Analysis Fields 1 - 6 (Dropdowns)
These are the 6 analysis fields that are attached to each PCM.

|
Click the Forward Button on the Wizard Bar to continue setting up the new agent |
|
|
Click the Exit Button on the Wizard Bar to cancel the new agent set up |
Screen Shot 8: Agent Currencies Screen
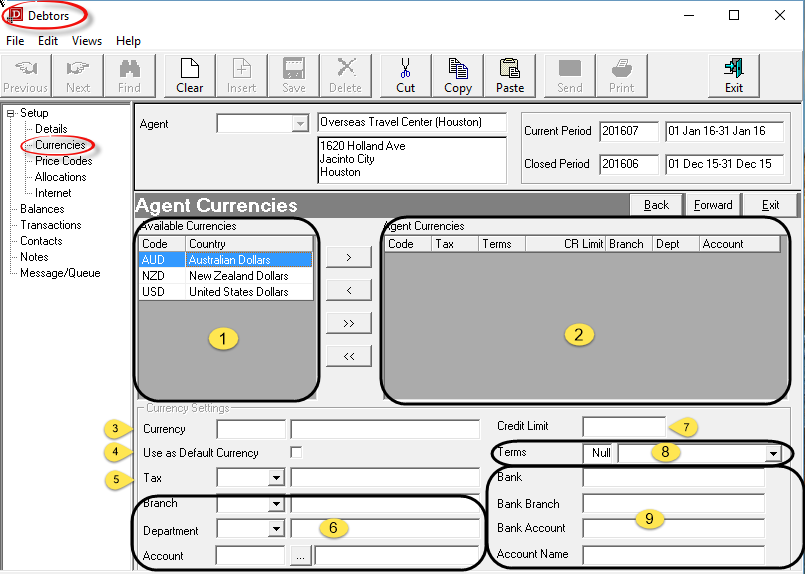
This screen enables Sell Currencies, Taxes, Revenue Account, Credit Limit, Payment Terms and Bank Account details to be set up for the agent.
 Available Currencies Section
All currency codes that have been set up in the system display in this panel.
 Agent Currencies Section
Currencies that are already attached to the agent display in the Agent Currencies panel.

|
Currency(s) can be added to the agent by highlighting them (individually) and clicking the |

|
Do not add currencies that are not likely to be used by the agent. This will only make reconciliation at the end of each accounting period more time consuming. Only currencies that the agent is going to be invoiced in should be attached. |
When a currency is moved to the Agent Currencies panel, the Currency Settings fields become live and can be completed.

|
Currency Settings must be defined for each currency attached to the agent. Highlight the currency that the settings are to be completed for in the Agent Currencies Panel. |
 Currency
When a currency is highlighted in the Agent Currencies panel, these two fields will display the code and country of the currency being worked on.
 Use as Default Currency (Checkbox)
Check this box for the currency that is going to be used most of the time for the agent. If more than one currency is attached to the agent, at least one currency should be checked as the default. If there is no default, then the user will have to choose a currency each time the agent is attached to a PCM/booking and will also have to choose when every financial transaction is entered against the agent. The default can be overridden at PCM/booking/transaction entry time.
 Tax (Drop-down)
Available taxes that have already been set up in CodeMaint are available from the drop-down list. To attach a tax, highlight it.

|
Any tax which is attached in this field is only used when Non-Booking transactions are entered against the agent. This tax is not used when calculating the taxes in a booking. Booking taxes are calculated on a service-by-service basis (allowing for service items that may be non-taxable) and the tax on mark-up and commission is calculated based on the attached to the agent or the booking. |
 Branch/Department/Account (Drop-downs/Search)
These three fields can be used to attach a GL revenue account that all revenue generated by the Agent/Debtor can be posted to. This is only encouraged where the Debtor is not a Booking Agent—i.e., a sundry Debtor and will never be invoiced for bookings.

|
It is never recommended that revenue GL Accounts be attached to Booking Agent/Debtors. During bookings invoicing, the system will automatically post revenue to the GL Account set up in the INI Maint GL settings which will allow bookings revenue analysis to be made. Agent revenue analysis can be performed using the Excel Financial Analysis reporting tools, regardless of GL Revenue Account postings. |
 Credit Limit (Numeric, 11.2)
A credit limit can be entered against the currency in this field. There can be different credit limits for each currency attached to the agent. If the agent does not have a credit limit, leave the field as 0.00. If a credit limit is entered, the amount of credit remaining can be seen in the Balances screen of the Agent (Screen Shot 22 Agent Balances Screen – NZD Currency).

|
The agent Credit Limit is checked when the agent is attached to a booking, and again when an invoice is issued from a booking. The INI Maint Debtors, FastBook and GroupBook sections each have a setting for a Credit Limit Type which can be used to either:
|
 Terms (Integer, 4; Drop-down)
There are two fields which make up the credit terms for the agent. The first is a numeric value which is either a) a number of days or b) a date in a month depending on which setting is chosen from the drop-down list in the second field. Combined these are used to calculate the payment due date of an invoice transaction. The available options are:
|
nn days |
Prior to Travel |
|
nn days |
After Travel |
|
nn days |
After Invoice |
|
Date |
Of Following Month |
|
Date |
Of Current Month |
|
Date |
Of Month of Travel |
|
Date |
Of Month After Travel |
 Bank/Bank Branch/Bank Account (30 Chars each)/Account Name (60 Chars)
These fields can be used to store the Agent/Debtor bank account details. The Bank, Bank Branch and Bank Account fields can be output on agent messages and as well, the Bank Account field can be used in an Electronic Payment file (Requires the bank’s EFT file processing software, and may not be available from all banks or where foreign currency transactions are involved).
The bank details on this screen can be used to generate refund or commission payments to agents.
Screen Shot 9: Completed Currencies Screen – Example 1 USD
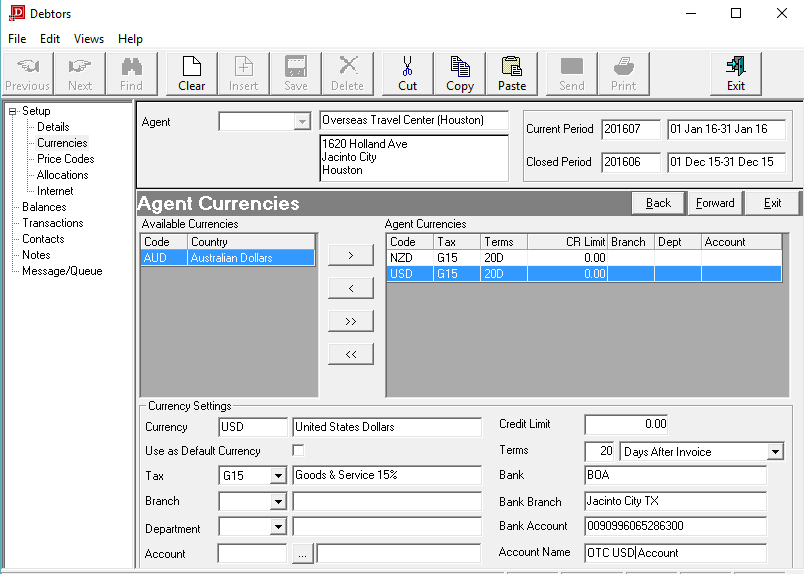
Screen Shot 10: Completed Currencies Screen – Example 2 NZD

|
Click the Forward Button on the Wizard Bar to continue setting up the new agent |

|
If any item on previous screens needs correcting, use the Back button on the Wizard Bar to go back. |
|
|
Click the Exit Button on the Wizard Bar to cancel the new agent set up |
Screen Shot 11: Price Codes Screen
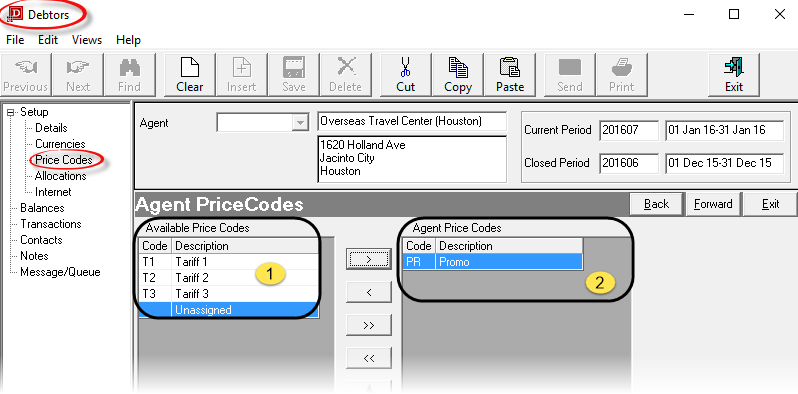
This screen is used to attach Price Codes that are applicable to the agent.
Price Codes are used to automatically apply different levels of product pricing, by agent, that have been set in the Product Database. Before these can be applied to an agent, they must first have been set up in CodeMaint. Then within the Product Database, selling prices per product per season per Price Code need to be set up.
If Price Codes are not being used — i.e. individual product selling prices are not being used to calculate Booking sell prices or there is only one level of product selling prices—this screen can be left with the"Unassigned" Price Code.

|
This example system is using a Price Code for Promotional Rates only and a different form of Product Markup (The Markup Matrix - see the System Setup Training Guide > Code Maintenance, > Database Node > Discount/Commission/Markup) for the main method of markup. |
 Available Price Codes
This is a list of Price Codes already defined in CodeMaint.
 Agent Price Codes
Select which available price codes apply to this agent using the buttons to the left of this panel.

|
Price Codes can be added to the agent by highlighting them (individually) and clicking the |
If Price Codes are being used as the main markup method, then the order in which the Price Codes are listed is important—the Price Code that Tourplan is to use by default when calculating quotation and booking prices for this agent, should be at the top of this list. The others will be used by Tourplan when the product to be priced does not have the default Price Code available.

|
The order of the Agent Price Codes can be changed by highlighting the Price Code to be re-ordered and then clicking the up |

|
Click the Forward Button on the Wizard Bar to continue setting up the new agent |

|
If any item on previous screens needs correcting, use the Back button on the Wizard Bar to go back. |
|
|
Click the Exit Button on the Wizard Bar to cancel the new agent set up |
This screen enables Allocation Split Codes to be attached this agent. When this is set, Tourplan will take inventory from these allocations when processing bookings for this agent. Multiple allocation codes can be attached to agents, and the order in which these are attached determines the order in which Tourplan will take inventory from the allocation.
Screen Shot 12: Agent Allocations Screen
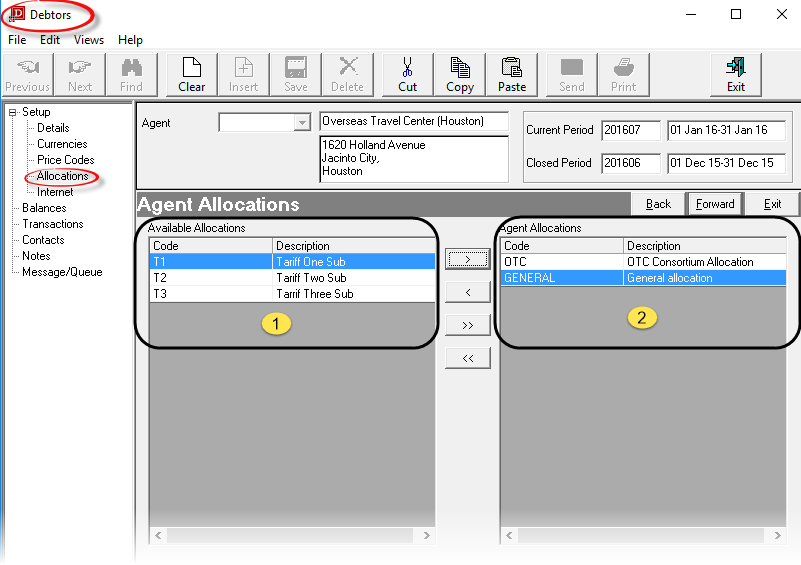
 Available Allocations Panel
A list of the allocation split codes setup in the CodeMaint application.
 Agent Allocations Panel
Select which available allocation split codes apply to this agent using the buttons to the left of this panel.

|
Allocation Split Codes can be added to the agent by highlighting them (individually) and clicking the |
In the example in Screen Shot 12 Agent Allocations Screen above, the first allocation split is one that is being held specifically for the consortium that the agent is a member of. If no allocation is available in this split, then the GENERAL Allocation will be used.

|
If only one allocation code is set up covering all supplier allocations, e.g. GENERAL, it is easier to attach it to all agents than to have to change selection/search criteria in a booking to make the allocation available. |

|
Click the Forward Button on the Wizard Bar to continue setting up the new agent |

|
If any item on previous screens needs correcting, use the Back button on the Wizard Bar to go back. |
|
|
Click the Exit Button on the Wizard Bar to cancel the new agent set up |
This screen controls whether or not an agent can access the system via the Tourplan iCom add on to enquire on services and to make bookings.

|
The optional and additional webConnect software (Tourplan Distribution & Enterprise Editions) is required for this functionality to be enabled. |
Screen Shot 13: Internet Details Screen
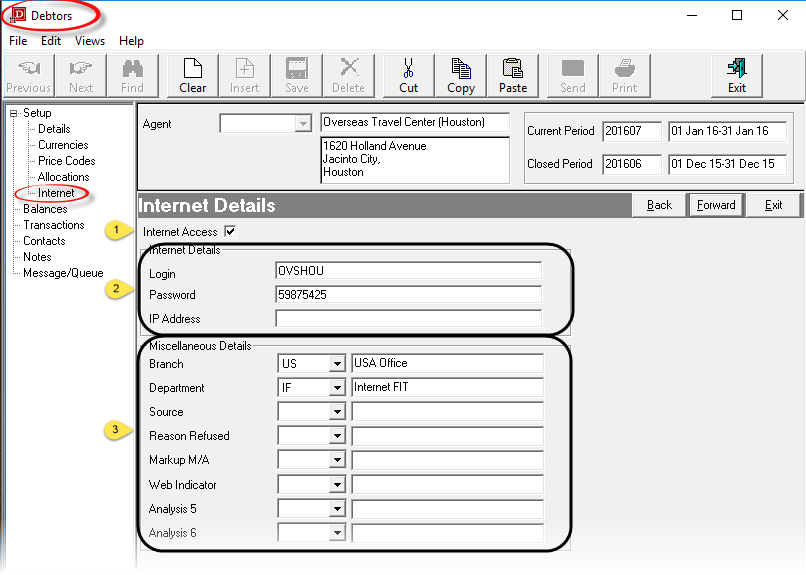
 Internet Access (Checkbox)
Before anything can be added to this screen, this checkbox must be checked.
 Internet Details Section
Login (20 Chrs)/Password (20 Chrs)/IP Address (60 Chrs)
The values entered in the Login and Password fields are what are given to the agent as their login and password to access Tourplan via the Internet.
The IP Address field is designed to validate the user logging in to Tourplan via the Internet by checking that the IP address loaded in this field matches the IP Address of the computer being used to login. In most cases, this is not practical, since it binds the user to a computer with a static IP address and prevents such things as roaming or laptop access from different locations and computers. Leave blank if validation is not required.
 Miscellaneous Details Section
Branch/Department/Analysis 1 – 6 (Drop-downs)
When the agent logs in to Tourplan via webConnect and makes a booking, the values in the Branch and Department fields will be used to build the booking reference and the 6 analysis codes will be used as the Booking Analysis entries in the booking header.

|
The defaults that apply here should not be confused with the Booking Defaults set up in the Booking/PCM Defaults Screen (Screen Shot 7 Insert New Debtor - Booking/PCM Defaults Tab). Those values will default when the agent is attached to a booking being created by a consultant in the system. The defaults in the Internet Details screen are used only when a booking is made via the Internet. |

|
Click the Forward Button on the Wizard Bar to continue setting up the new agent |

|
If any item on previous screens needs correcting, use the Back button on the Wizard Bar to go back. |
|
|
Click the Exit Button on the Wizard Bar to cancel the new agent set up |
This screen enables contacts for the agent to be set up, altered and deleted. Agent contacts are used in Tourplan’s messaging system to provide a pop-up phonebook when sending email or fax messages to an agent.
Each contact has a Contact Type and Contact Types must be set up in CodeMaint before setting up Contacts.
Screen Shot 14: Agent Contacts Screen
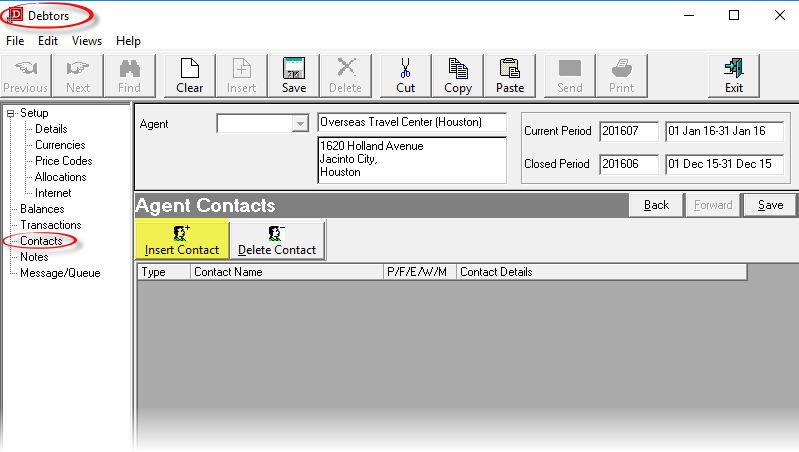
To add a contact, click on the Insert Contact button (highlighted yellow above). The Contact Details dialogue box displays.
Screen Shot 15: Contact Details
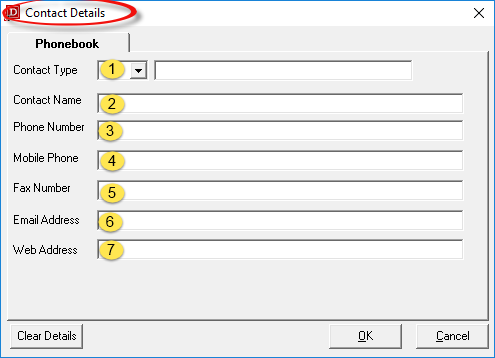
 Contact Type (Drop-down)
The type of contact.
Examples are: AC – Accounts; SA – Sales; RS – Reservations; AD – Administration etc. These must first be set up in CodeMaint > Messaging > Contact Types.

|
Contact Types can be used multiple times in this screen - e.g., there can be more than one contact with a Contact Type of 'RS' (Reservations), provided the Contact Name is different for each contact. |
 Contact Name (60 Chars)
The name of the contact. E.g. Ms Catherine Watson. Generic names can also be used—e.g. Reservations, Accounts etc.
 Phone Number (40 Chars)
The phone number for this contact. The number may be different to other contacts at this agency.
 Mobile Phone Number (40 Chars)
The mobile phone number for this contact. The number may be different to other contacts at this agency.
 Fax Number (40 Chars)
The fax number for this contact. The number may be different to other contacts at this agency.
 Email Address (60 Chars)
The email address for this contact.
 Web Address (60 Chars)
The web address for this agent (optional).

|
Fax and email details can be used by the Tourplan messaging system to send messages to the agent. In the case of faxing, additional Tourplan compliant fax software is required. If faxing is to be used, then the fax number must be entered in the format that the faxing software requires. |

|
If the Debtors (A.R.) CRM Integration is enabled, then a further tab is available in the dialogue box shown in Screen Shot 15 Contact Details which allows additional detail to be entered for the contact. |

|
When the above entries have been completed, click the OK button to save the contact details. The Contact Name field will be cleared and details of the next contact for this agent can be entered. Phone, fax, email and web details are retained, but can be overridden if necessary. |

|
When entries of all contacts for this agent have been completed, click the Cancel button to return to the Supplier Contacts Screen where a list of the contacts is now displayed. |

|
Click the OK Button to save the Contact. The Contact Details fields will be cleared (except for phone and fax numbers) and details of the next contact for this agent can be entered. |

|
Click the Cancel Button to return to the Agent Contacts screen where a list of the contacts will be displayed. |
|
|
Click theClear Details Button to clear all fields in the dialogue.Button on the Wizard Bar to cancel the new agent set up |
Screen Shot 16: Completed Agent Contacts Example
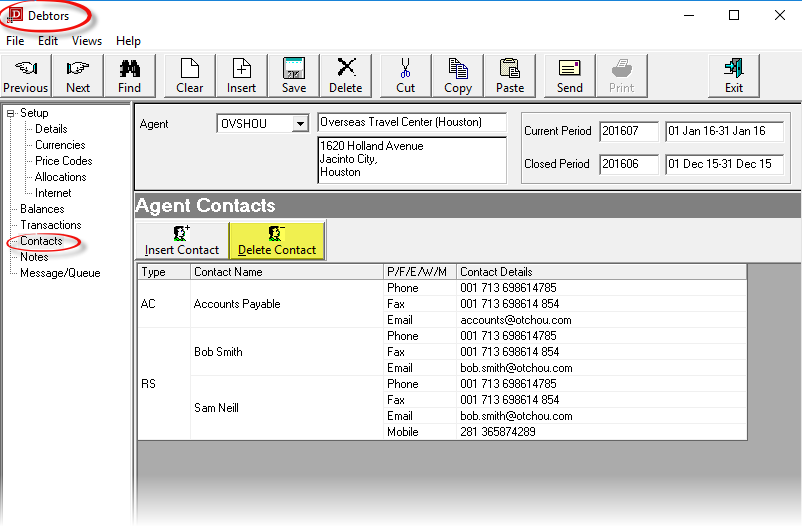
To change the details of a contact, double click the contact and edit the fields as required.
To delete a contact from this list highlight one of the listed contacts for this agent, click the Delete Contact button (highlighted yellow above) and click the Ýes' button when prompted.

|
Click the Save Button on the Wizard Bar to complete the set up of the new agent |

|
If any item on previous screens needs correcting, use the Back button on the Wizard Bar to go back. |
|
|
Click the Exit Button on the Wizard Bar to cancel the new agent set up |
Screen Shot 17: Completed Agent Example
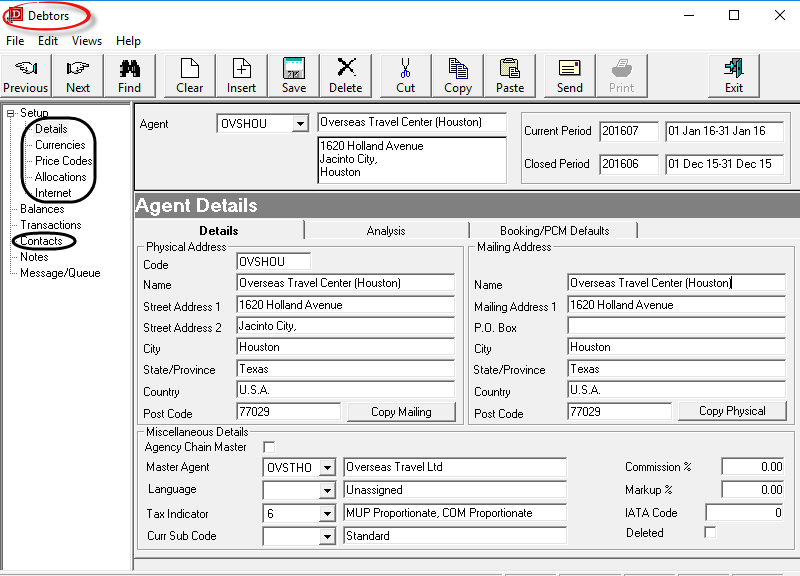
The Add New Agent Wizard has stepped through all of the screens under the set-up node in the side bar menu, as well as the Contacts node further down. The menu items Debtor Balances Debtors Transactions and Debtors Message/Queues are discussed in later sections of this Training Guide. One additional (and optional) set up item that could be entered at this stage is agent notes.
This screen enables free format notes (and/or graphics) to be stored against the agent.
Debtor Note Categories must be set up in CodeMaint > Messaging > Notes prior to entering agent notes. Details of Note Categories are in the System Setup Training Guide.
Screen Shot 18: Agent Notes Screen
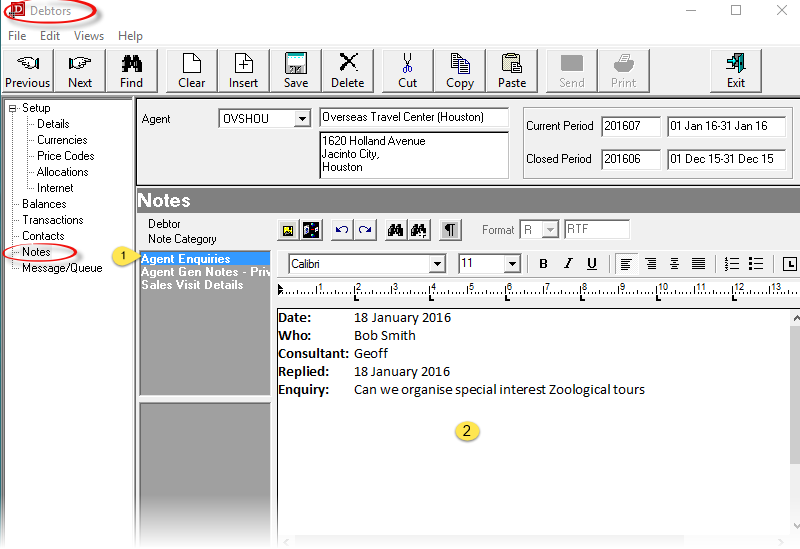
In the above example there are three categories of notes that have been set up:
|
Agent Enquiries |
This example note category is used in Screen Screen Shot 18 Agent Notes Screen above. This note category has a 'template' attached to it which has the example required headings (in bold) set up in it. |
|
Agent Gen Notes - Pvt |
This example note category is designed for internal use only - the 'PVT' indicating it is a Private note category and should not be included on any agent or customer documentation. |
|
Sales Visit Details |
This note category is designed to hold details of sales visits made to the agent. |
When note categories are set up, they can have multiple note entries or single note entries per category and templates per category can also be set up.
To enter a note first highlight the required note category from the list  then click in the Editor window
  and type a note.
To save a note click on the Save  button in the Button Bar.
Once a note has been saved, the following details are recorded against that note and displayed at the bottom of the screen - Created By; Created Date; Edited By; Last Edited Date.
An agents details can be copied to a new agent.
While the details of the original/source agent are loaded, click the Insert button  on the button bar.
Screen Shot 19: Copy Agent Dialogue
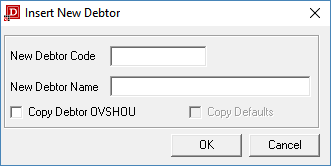
The Insert New Debtor dialogue (the same as in Screen Shot 4 New Debtor Code/Name Dialogue) displays. There is an additional check box which can be checked if the agent currently loaded is to be copied.
Enter the New Debtor Code and New Debtor Name. To copy the currently loaded agent, ensure the check box is ticked. Click the OK Button  and the agent will be copied. Any detail that needs to be edited/changed can be accessed via the side bar menu.